Building a Tiny House
DIY stories: the ideas, the screw-ups, the conclusions 🔨
Published on 3rd of December, 2018
This is the post that I really wanted to write but felt like I need my own blog for it. So now, after spending a few days creating this blog and writing some other posts, it’s time.
First Off, Why Build a Tiny House?
For playing the drums 🥁.
My journey towards playing the drums has been going on for about 20 years now and never gotten to a fully satisfactory status so far. There are so many problems for an aspiring drummer, it’s kind of tough to get there.
First, in my childhood years, when I first wanted to start learning how to play the drums, my parents were against it. A bit later, I kind of managed to persuade them through the old strategy of nagging until they gave their Okay.
That wasn’t enough, the next problem were the neighbors. Even though the neighbor’s son used to play the drums as well before moving out, they weren’t tolerant. So, no drums for me until I left that home.
Which happened after school. I went off to study in a different city, Darmstadt. What followed were years of being a poor student who couldn’t afford to buy a drum set, let alone rent a place into which that could fit. I played guitar and whenever I practiced with my band mates I used the chance to play some drums in the practice rooms as well. Not nearly enough, I must say. Also, it annoyed my band mates as it didn’t further our collective effort. (And due to the lack of practice, my skills were poor – twice as annoying.)
After starting to work a real job and earned some money I got closer to the goal, after all. I bought my first drum set, a very nice Gretsch Catalina one with Zildjian beginner’s cymbals, before I even had enough space to unpack the packages in our flat. Sophie and I had moved in together around that time.
Then, we moved into a bigger place with a basement, and finally I saw my chance! We met the neighbors for the first time and they were really friendly. But you guessed it, they didn’t like me to practice the drums. Even though I put quite some effort into sound-proofing the basement room. For years, we had a deal that they would always tell me when they left the house, and I would only play during those times. That turned out to coincide with my own free time just about once every 4-6 weeks for a couple hours. You can’t improve any skills like that. It was a bit frustrating to keep developing the same blisters every time I played.
I tried renting sound-proof boxes to play in, until the providers declared bankruptcy unfortunately. I talked to companies who sell used shipping containers to use as rooms and put into our backyard. In the end that didn’t work out because of the structure of our garden. So, the next thing I got into my head was to build a sound-proof little house on my own. That’s the Why.
What Exactly is a “Tiny House”?
Usually, the term refers to buildings that can have everything a family needs to live in it, while being as small as possible as well. That includes containing a tiny kitchen, enough beds, a bathroom with a shower, and often very clever fold-out furniture or even stair cases. The idea is to live a frugal life and focus on the world outside of the house. And show off a cute looking house.
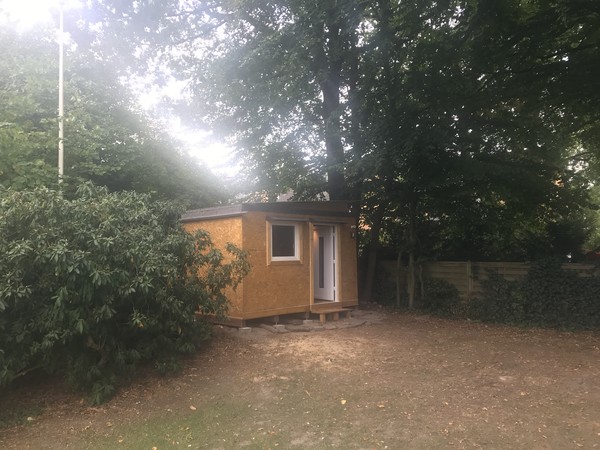
This is not my intention, at least not with this building. What I’m building here, is, strictly speaking, more of a “tiny room”. It’s just supposed to have enough space to put up said drum set inside. Everything else is not a priority, and not even on the table. I think I might incorporate some “Tiny House” ideas into the building later, but for now, it’s just a tiny, insulated room. Still, I’m occupying the right to call it a Tiny House. Because it’s kind of a house.
How to Start Building a Tiny House?
A bit of research, asking some friends, and then just doing it. That’s my approach for lots of things. In summer of 2018 I had arrived at the comfortable situation that my company was doing rather well and many of my clients were in a low activity summer mode, which meant more free time and enough funds. Also, I came across a blog post by financial advisory blogger Mister Money Mustache, in which he explained how he managed to build a Tiny House for just 3,500 US-Dollars in just 120 hours. I read the post and loved it, but at the same time thought I can do that for less money in less time!
It all came together, so at the end of June I started to research foundation building and wrote to an architect friend of mine, Achim. He answered all my questions regarding legality, structure, isolation materials in great detail. That gave me enough confidence I could do it. Sometimes I build simple things out of wood, chairs and beds and the like, but I had never before built sort of a house. This is a first time thing for me. How hard can it be, though?
The Amount of Planning Was Also Tiny
I like to just do stuff, make mistakes along the way, and then correct them or learn for next time. That exact approach seemed a good idea here, as well.
First, I thought the measurements of the current basement room where my drum set was situated seemed to be a good size. Its sides have a length of 3.75 meters and it’s about 2.20 meters floor to ceiling. The Hamburg regulations say that a garden house can be built without any formalities and paper wars if it’s less than 30 square meters in size and has a standing inside height of 2.30 meters at most. That fits the plan. I also knew I would like to use wood as a main material because of its easy handling, accessibility, and low cost. As sound-proofing insulation, I was recommended to use rock wool, which is also cheap, rather environmentally friendly, and does the job quite well, apparently.
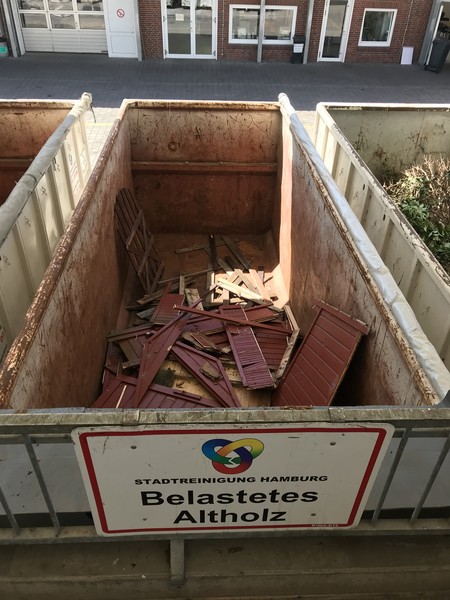
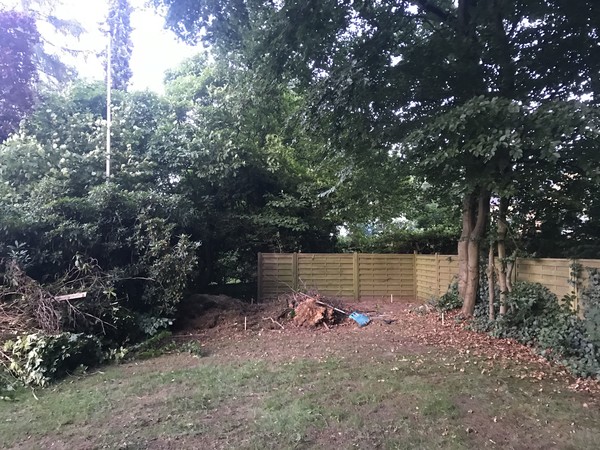
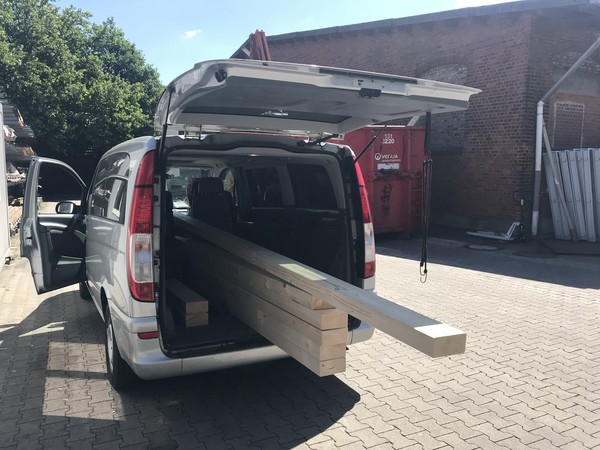
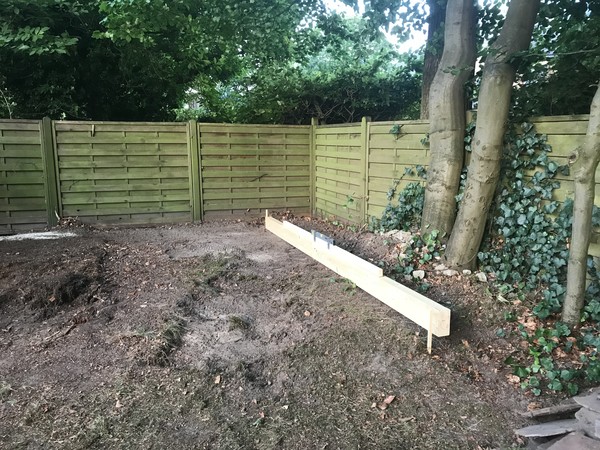
Making space for the new little house was done in two days. I just needed to tear down the old and broken shed, get the remains of it to the recycling center, cut down a few plants, and clean the area from twigs and that sort of unwanted stuff.
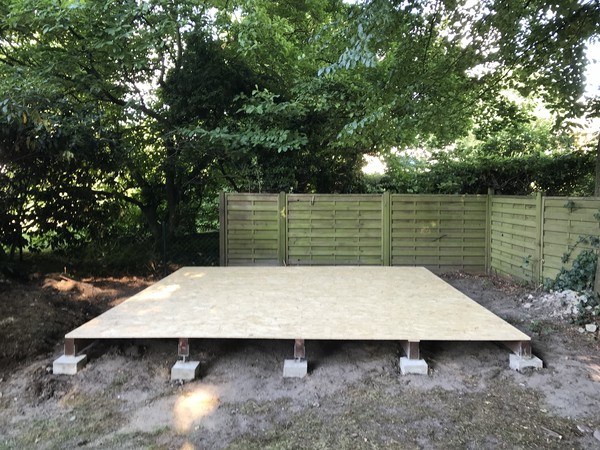
The Foundation
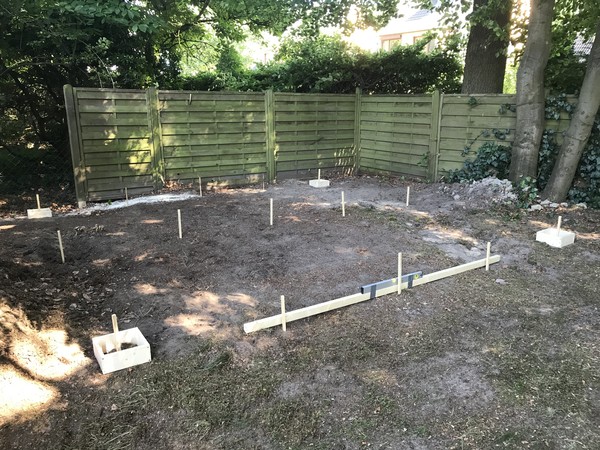
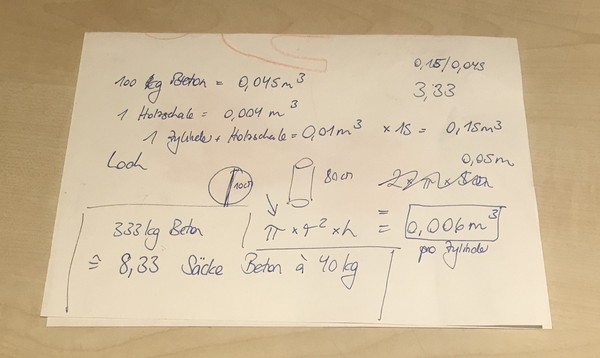
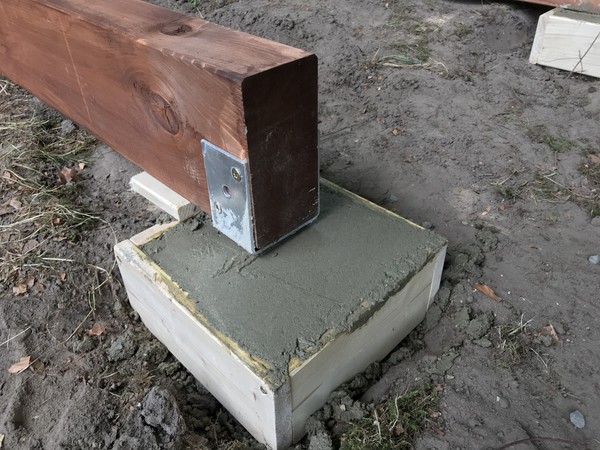
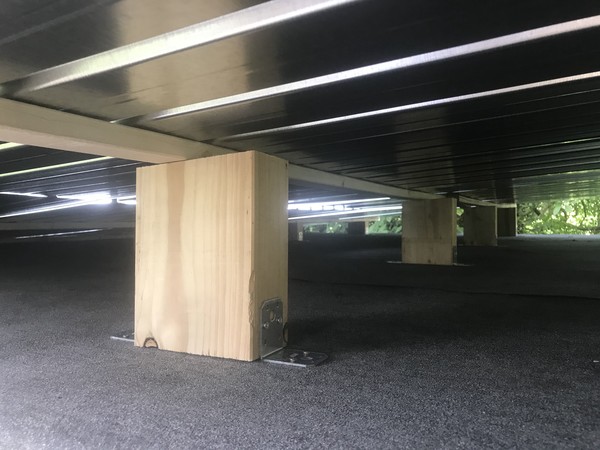
My research lined up with what my architect friend recommended, and that is that I should probably start by building a point foundation with concrete, reinforced steel, and thick timber underneath the house. That’s a lot cheaper and easier than creating a solid concrete plate but is still supposed to make it through a harsh winter with sub-zero temperatures. I just need to find a way to dig 80 cm deep holes into the soil. Fortunately, a hardware store in the area rents out machines to do just that. Gas powered, sturdy machines that stink like hell and could kill you. But, you know, let’s try this!
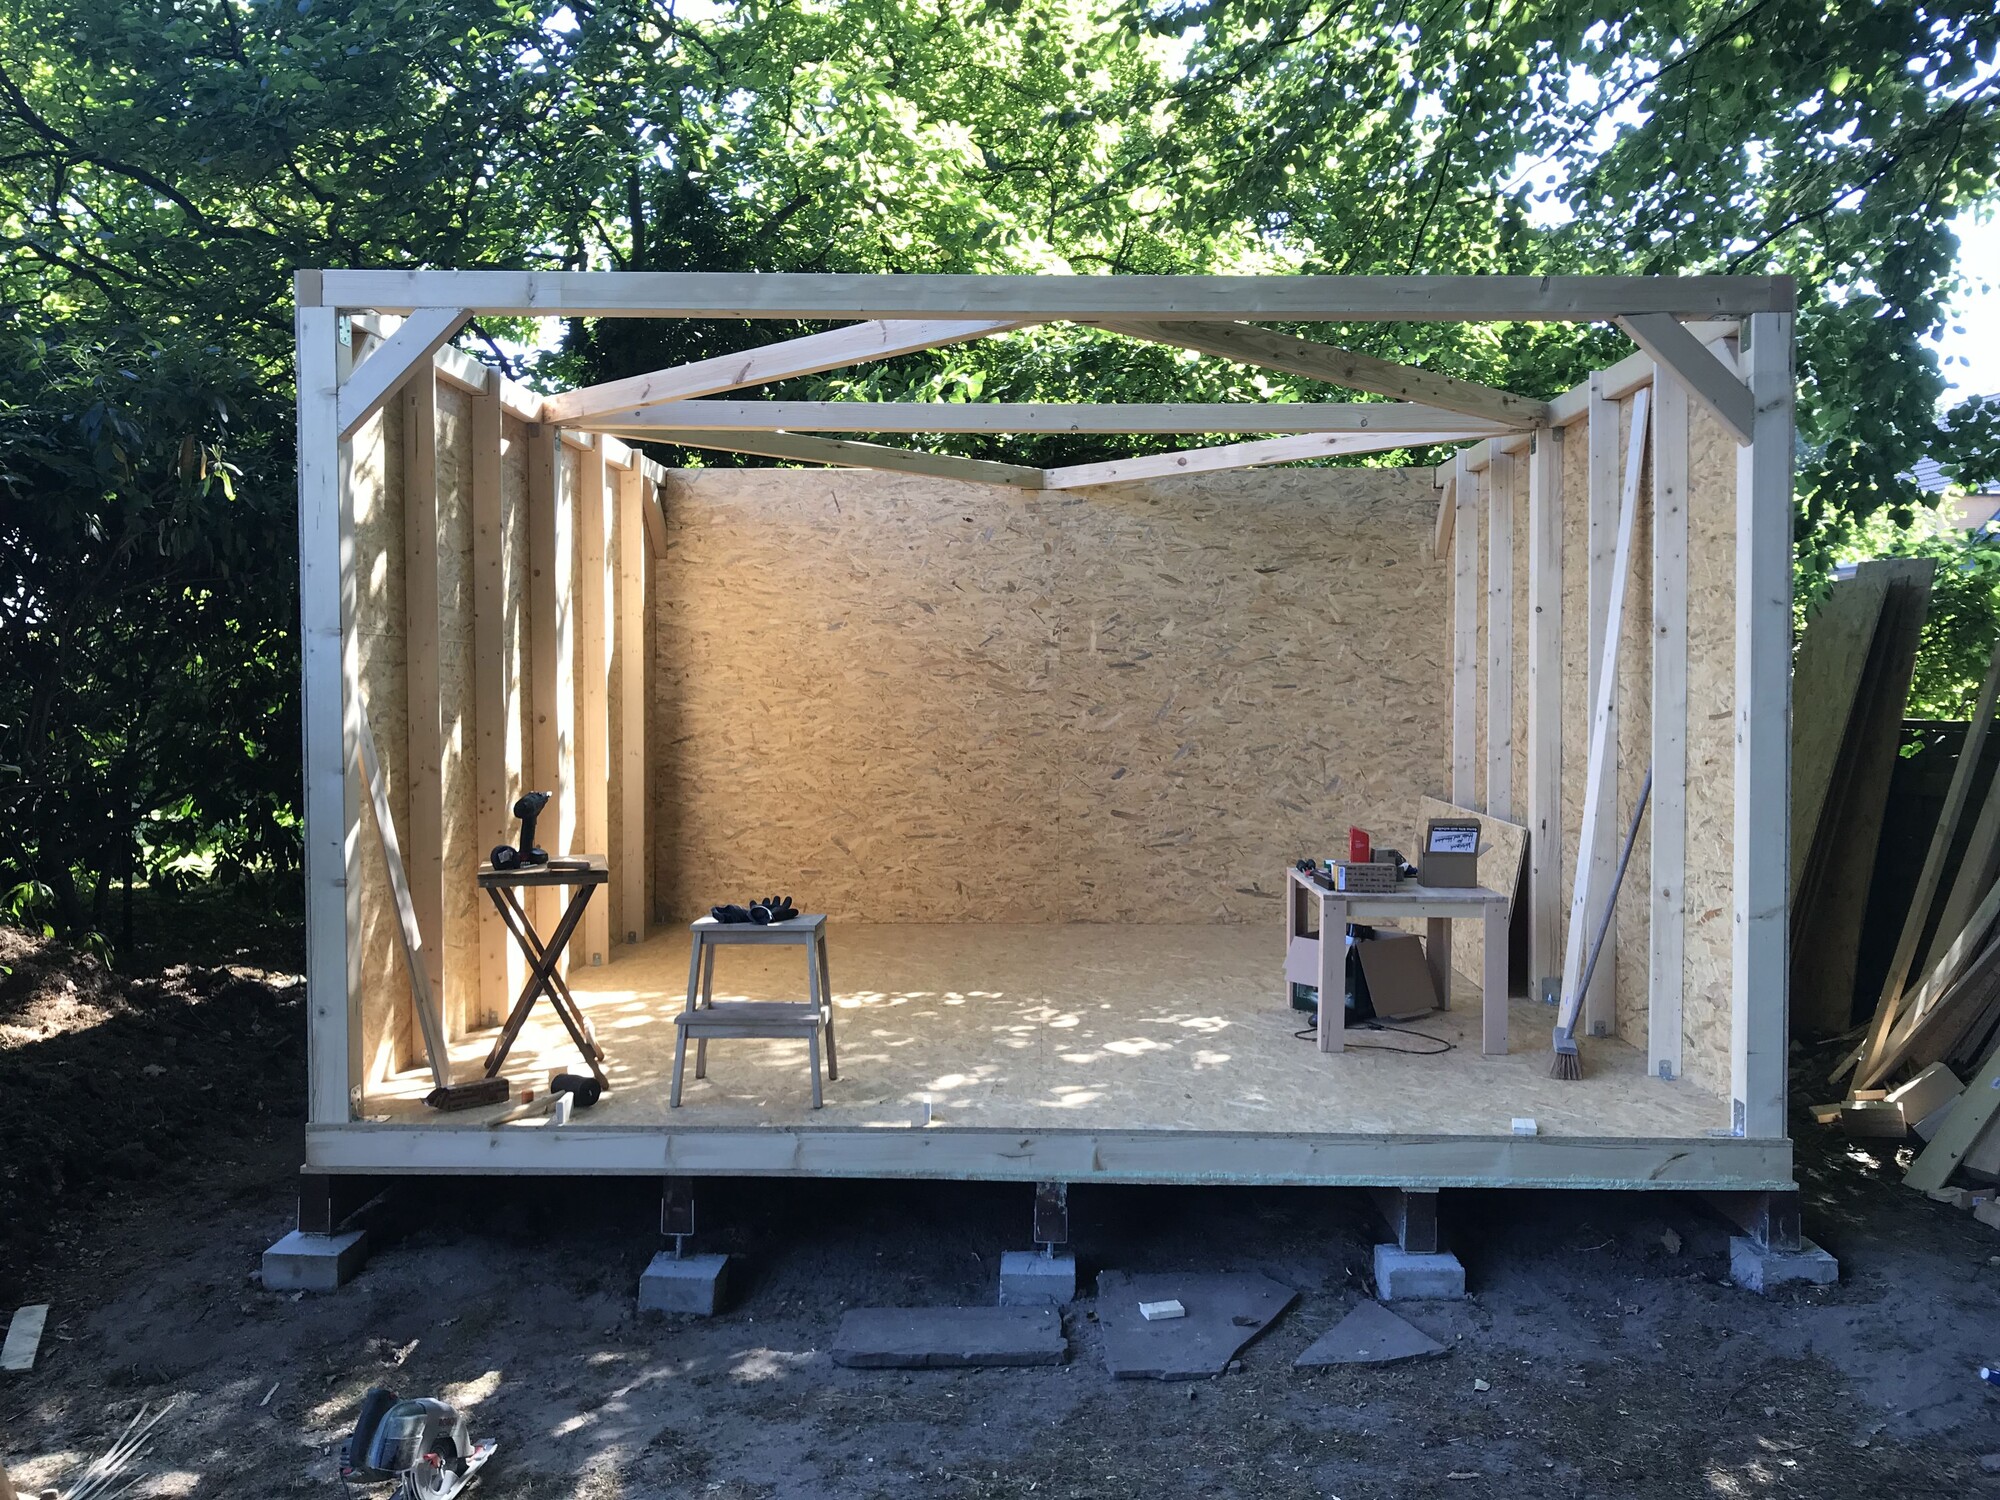
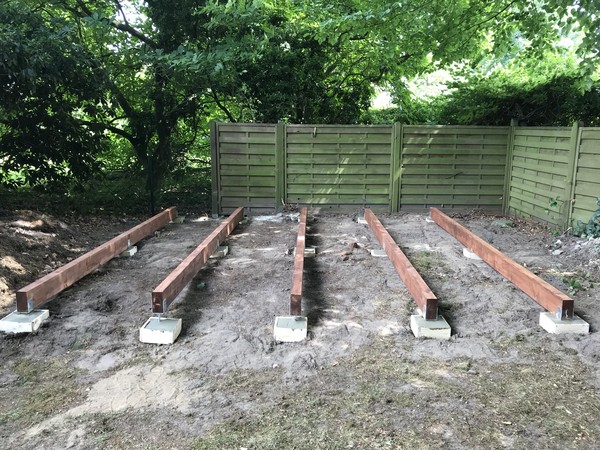
I chose to use five construction wood beams, each 4 meters in length and 8 centimeters by 16 centimeters in thickness. Separated by one meter each, these would require 15 of the point foundations (3 by 5) to be symmetrical and allow for even weight distribution. 15 foundations are a bit much, as my architect friend suggested that 9 in total should suffice for my plans, but as it‘s not a lot more expensive to create 15 instead, and it allows for more general stability and therefore, more options later on.
Solid gold drum set, anyone?
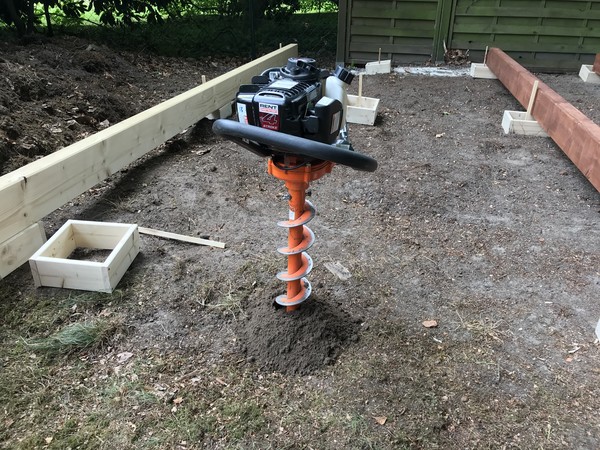
It took quite some strength to keep this gas powered device in check. My arms sure felt heavy afterwards, but it was worth it. To make a point foundation safe during winter and temperatures below zero, you just have to dig deep, there’s no way around it. Unfortunately, the soil was full of roots of the nearby trees and plants, and I also dug up some terracotta stuff.
Any archaeologists here who‘d like to have a look?
Despite the power the machine supplied, I wasn’t able to dig all of the holes down to 80 centimeters. A bunch of them ended up just half as deep, because the machine got stuck. Theory and reality don‘t always align, I learned. I thought about researching measures to take to change this, but eventually decided against it. My gut said it would be enough stability to have most of the 15 foundations deep enough. Especially since 15 are quite a bit more than I would need anyways.
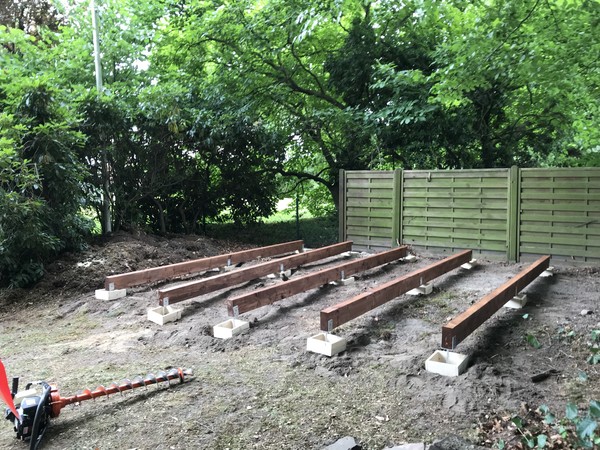
I build tiny wooden frames to hold the concrete above the surface in shape, which took some time as well. But it has to look nice and sit a bit above the ground so I can have air circulating below the house later, as well as have it easier to make the floor surface even. It turned out to be a good idea in general, but my dilettante‘s skills were not enough to have all of them align perfectly. Good enough, though.
On to the concrete creation and pouring!
Playing with Mud
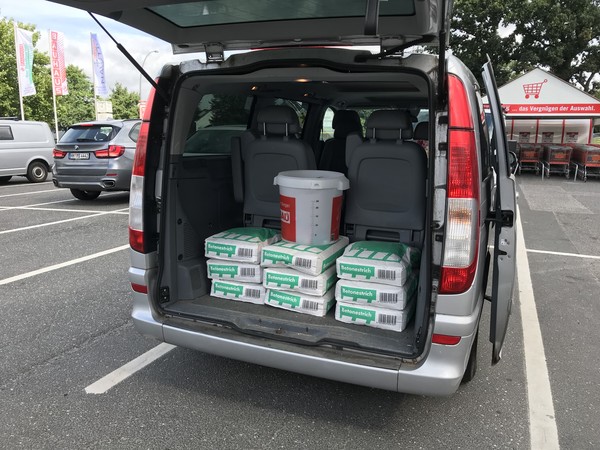
This was a fun step, as I‘ve never dealt with concrete before. Before researching the matter, I thought it can‘t be that difficult. Just some mineral sand and water, right? Turns out, concrete is highly dangerous! You should never let it come into contact with your skin and definitely avoid breathing the dust it creates. It’s a serious health hazard. So I stocked up on safety gear.
A big bucket and a stirring adapter for my standard electric drill were also necessary tools to create the concrete. But even with all the precautions and hot clothes in the hot summer I wore, this was lots of fun. Like playing with dirt that can build serious stuff.
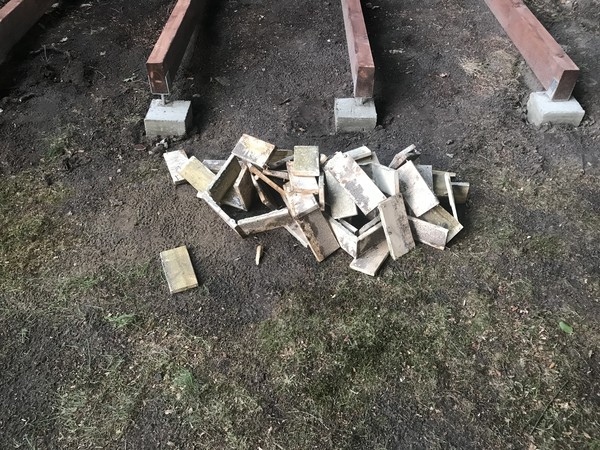
I had the timber oiled and prepared with the reinforced steel shoes, balanced on my wooden frames to be as close to even as possible above the 40 to 80 centimeters deep holes. So I just had to pour the concrete into the holes and create an even top at the top end of the frames. This was easy and fulfilling work of a few hours.
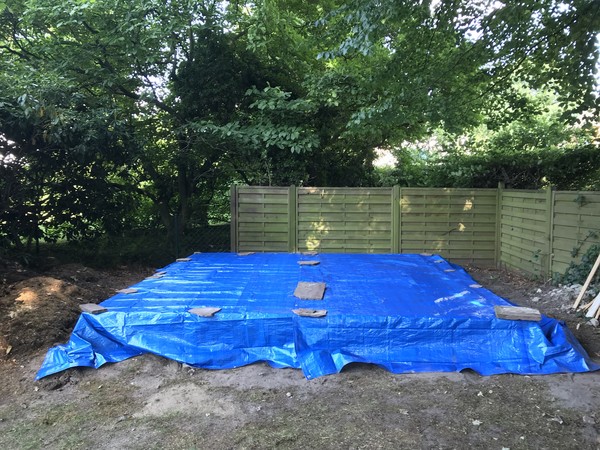
Now, the concrete needs to dry out. This takes about five days. Counterintuitively, it needs to be kept a bit moist during that time. The straight sun and heat of Hamburg‘s current summer conditions wouldn’t be the best.
I got double-lucky here, because not only was there slight rain in the weather forecasts but I also had a three-day trip to London planned, during which the foundations had time to dry up. I could just leave, having nothing to do on the house anyways, come back, and find the foundations perfectly dried up after being watered by the clouds. Cool!
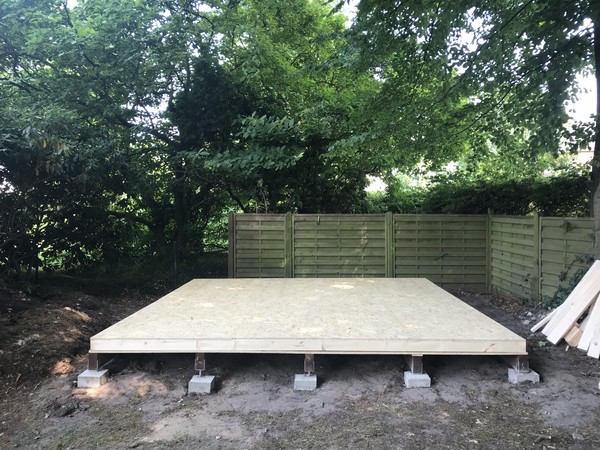
Good. After this step was completed I felt like the difficult part is done. Just a bit of screwing wood together is on the list, right? Kind of correct, but this took quite some time, too. It felt good to be able to work above the ground, now. I don‘t have to deal with much more dirt and soil from now on.
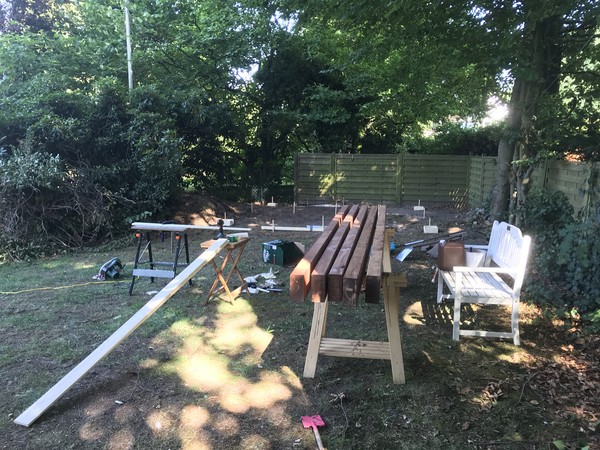
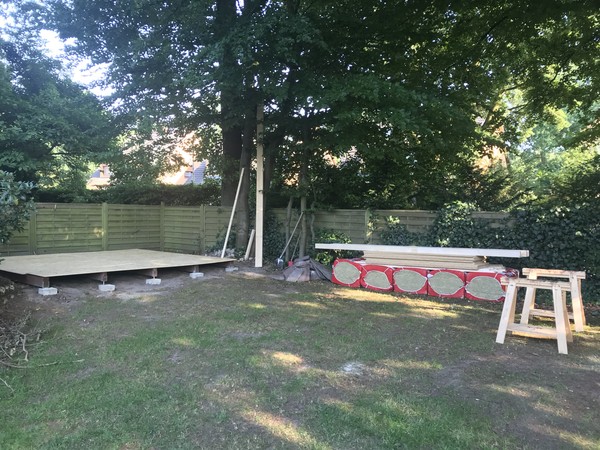
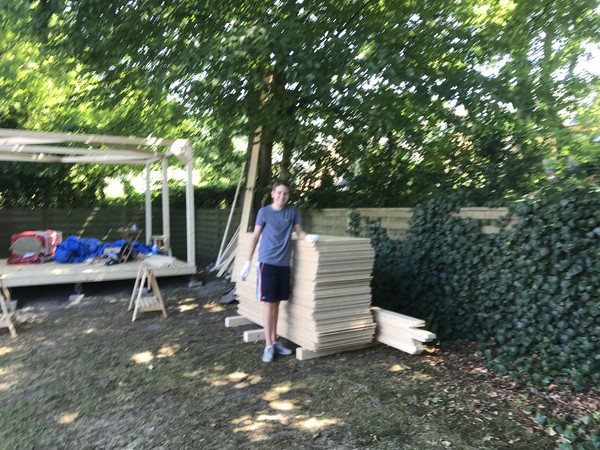
Another trip to the hardware store to get OSB, „oriented strand boards“ which made out of left over wood pieces and some sort of glue using high pressure. They are quite cheap but still sturdy and weather-proof enough. I chose the 18 millimeters thick ones for the ground floor and 12 millimeters for the walls and ceiling. “See you again tomorrow!”, the hardware store clerk said to me.
At this point I was rather optimistic to keep my set goal of staying below Mister Money Mustache‘s 3,500.00 US-Dollar budget (that’s around 3.100,00 Euros in autumn of 2018) and his 120 hours of work. I kept doing everything on my own, albeit lots of friends and neighbors asking me to let them help. It’s the same as when you’re making a fire for a barbecue, where one is doing the work and all the others stand around making suggestions on how to do it instead, but not being able to really do it better. I always find that behavior hilarious but at the same time can't help acting in the same way myself from time to time.
But this is my own project and I intended to keep it that way. No one to blame but myself if anything goes wrong!
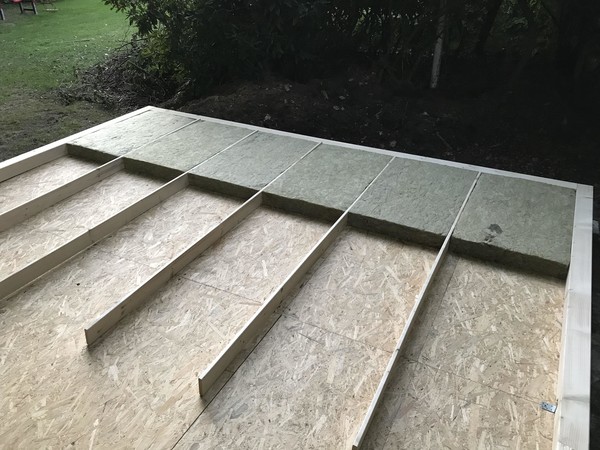
Floor Insulation
Of course, because I‘m building a shed for playing drums in it, the noise insulation is one of the most important things here. This also consumed a big chunk of my research time. I wanted to find the best material which is not insanely expensive, but importantly also environmentally friendly and fire-proof, long-lasting, and reducing noise and the cold as much as possible.
Here, my architect friend Achim played a very helpful role again, not only answering all my questions and making some suggestions, but also sending me a two-hundred page book about insulation materials used for building houses. I skimmed it and learned a lot.
What came out of the other end of that research?
Rock wool.
The stuff is very good at reducing noise, it can‘t burn, it‘s not expensive and easily available at the usual hardware stores, and there‘s no harmful chemicals in it. It ticks all the boxes. Other materials I considered were
- glass wool: very similar to rock wool, but more harmful to you when working with it
- styrofoam: cheap and effective, but very harmful to the environment
- hemp and other plant-based alternatives: rather expensive and not as fire-proof
- sand or rock: probably the most effective but impractical to work with and much too heavy for my construction
I was very happy with my clear winner, rock wool. It‘s easy to cut if you use a special saw, it‘s light and effective. If you shout against a sheet of it, the sound really gets sucked in, it‘s funny.
Achim also advised me to double cross-lay the sheets, but I wasn‘t able to do that due to insufficient experience and YouTube material. Tough luck. Instead I chose to use wooden planks as separations and stability measures and put 10 centimeter thick rock wool sheets between them. That creates some small thermal bridges, which is not what you want, but I couldn’t find another practical way.
Cutting the wool with that special saw also was oddly satisfying. Lots of these manual tasks were really enjoyable to me, I learned. There‘s something nice about creating things with your own hands.
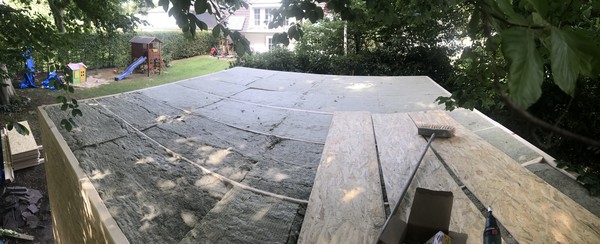
On top of the 10 centimeter of rock wool I put another layer of 18 millimeter OSB sheets to create a tough floor for strong double bass foot work.
🤘
Up until this point I had spent just under 1.000,00 Euros, including some supplies that would become necessary after this step. The time tracking says I’m at 30 hours and 30 minutes total research and work time over the course of roughly two weeks since I started. I’m thinking I’m well on track to reach the time and budget goals.
I have excluded the money spent on new tools into a different spreadsheet, because that’s going to be used by me for many decades to come, ideally. For example I had to get a new hand-held circular saw to cut the OSB and the other wood. In the end, I spent just over 250,00 Euros on tools like these. So that’s kind of on top, but if you have a better sorted tool shed than me, you will be able to save money here, obviously.
But Where Did I Get the Time?
I got a bunch of comments like “I could never squeeze this into my busy life” or “How did you even manage to do that with four kids? Do they still get to see you?” – to which I say, you probably already know from your own experience, that if you really want to do something, you will find the time, regardless of the circumstances.
On average, I spent around 2-3 hours per weekday on this shed. An hour after I’d brought the kids to kindergarten, the rest in the evenings after I had brought them to bed. On weekends I spent more time on it, but as the kids roamed the garden anyways, we had the time together and they even helped me with some non-dangerous tasks.
That only leaves work as a limiting factor. It was just lucky that my work situation turned out to be quite comfortable over the summer. Many clients were very productive with my company during the spring and then got into a rather lazy summer mode, like some southern European countries do anyways. I once worked at a web company in Barcelona and couldn’t believe it when they said they’re all taking off for the summer. Six or eight weeks of basically no real work getting done. But the more I thought about that the more I understood and came to the conclusion it’s a good idea. As long as there’s no real harm done and you’re okay to lose some financial possibilities, who cares?
So I put the company into “sleep mode” during the summer as well, but had to spend about 2-3 hours at it each day anyways, as I’m running the company. Taking up no new projects and delaying big ones wherever possible did the trick. It wasn’t a problem to anyone, thankfully.
In the end, the biggest motivator was I just wanted to play the drums.
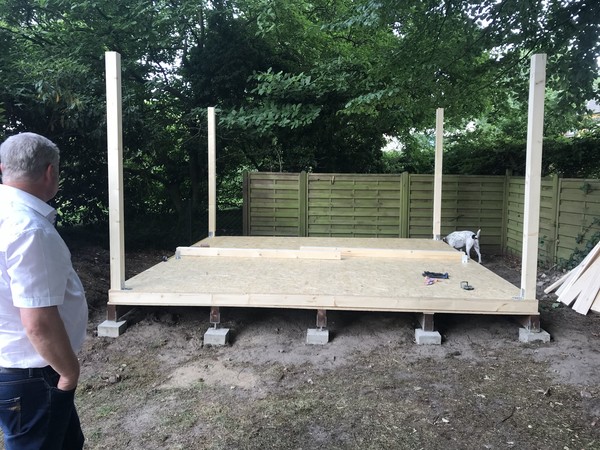
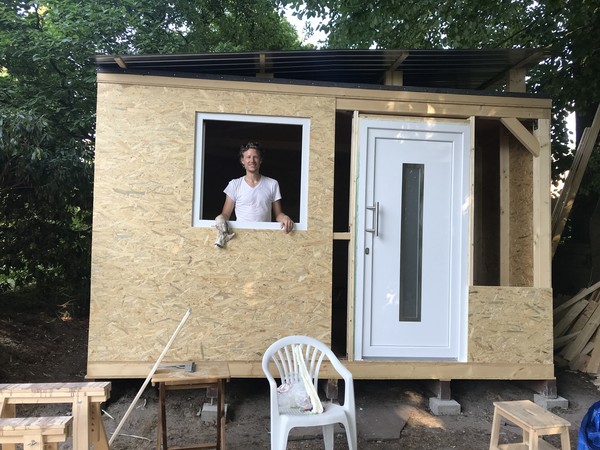
Michael, who you can see on the left, showed quite a bit of interest into this project, as he would be the main beneficiary of it. He is my neighbor, and he’s the one that got annoyed by me playing in the basement. Also, he was interested from the perspective of a craftsman, or, shall I say, a male being. He was very positive and impressed about it, but couldn’t hide his dozens of ideas for improving the building process from me. As is tradition, with male beings. I took it with a smile.
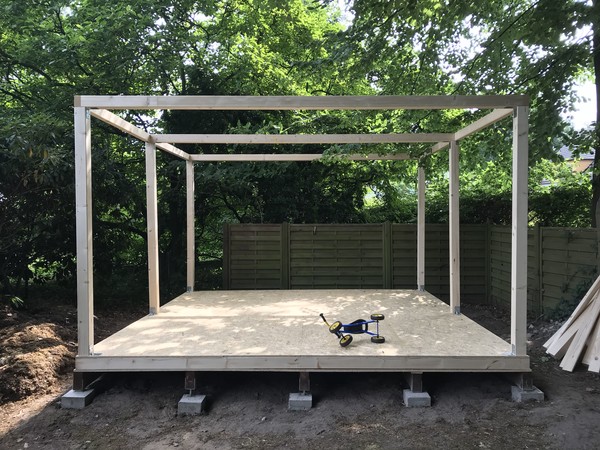
It’s coming together. I used heavy 10 by 10 centimeter timber for the most important connections, and 6 by 10 centimeters for some of the others. I did this all using the proven concept of trial and error, and was content with fixing the occasional problems. For example, after bolting together this frame, I saw it swayed and was slightly crooked. Not ideal. To give it more stability I improved the structure on the fly, so to speak.
Glad I paid attention during the bits in maths class where they told us about the Pythagorean theorem and the Law of sines. Those are probably the only useful things I learned in maths classes after the first six years. But man, they really are useful to know.
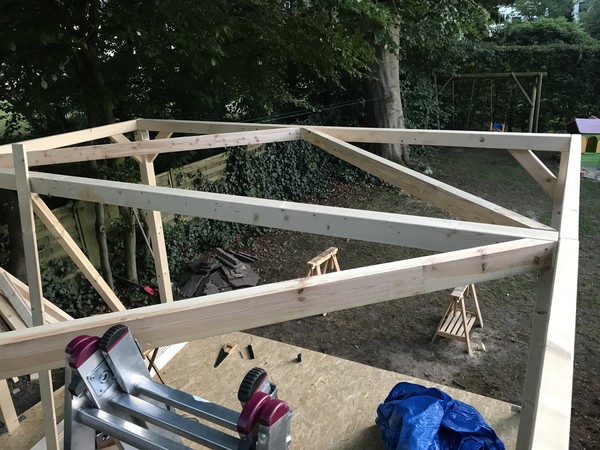
This time, the margin of error was more acceptable to me. With these new diagonal beams, the structure got very sturdy.
Building the Walls
I did this very straight forward again, just cut the boards into the correct size and screwed them onto the frame. Wood is just so easy to work with, it’s great.
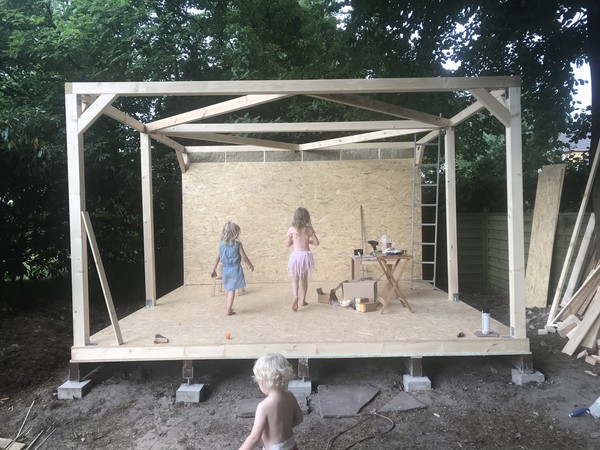
After this step I realized the back wall was shaped more like a trapezoid than a rectangle. Another mistake I had to correct and learn from. It took about 1.5 hours to take the boards all down, correct their shapes, and recreate the wall in a more symmetrical way. Painful, but it was a good decision to go back.

At this point, the structure is already quite pleasing to look at, I think. It all looks okay and strong enough to hold up.
Now it’s time to take care of the ceiling.
You might think there had been lots of rain during this summer, but that’s not true. Several parts of the country suffered from a dry period. We got lucky, getting some rain about once a week on average for a short time.
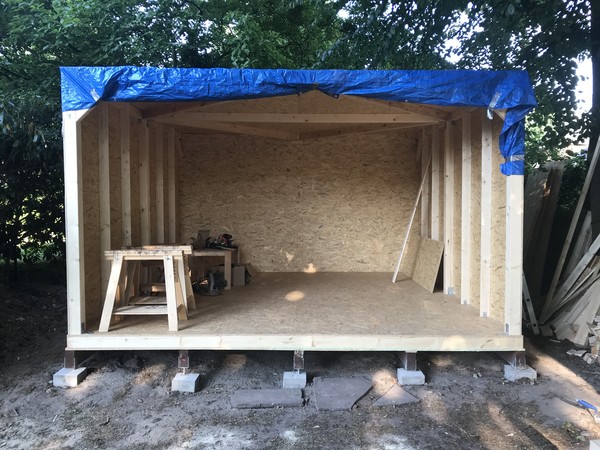
After I completed the first layer of the ceiling, the structure finally felt like a sort of shed. A building that could, in theory, provide shelter from the elements. It was a cool moment to realize that.
Climbing around on this roof gave me the chills, to be honest. Ever since I stupidly fell down through my office’s ceiling earlier this year and broke two ribs in the process, I got quite careful. So this wasn’t easy for me. Also, you want to avoid touching the rock wool with your bare skin, because the tiny parts creep into the pores of it and create an itch that’s a bit annoying. It’s over after a day or two, but still.
So I crawled around on spare planks and screwed the real planks onto the rock wool structure system I created just like the floor and walls.
What to Do During the Time Spent Building?
Building things outdoors is, quite obviously, a very rewarding thing to do. Whenever the stress and workload from an office job (or whatever) gets overwhelming, this helps. I enjoyed the meditative state I got into. The brain just has to work very slowly for a change, as the tasks are very simple and straight forward. That’s nice, too. But right around this time, I started to get a bit bored.
Listening to music doesn’t help, because the music that I like is very complicated and requires a big amount of attention. I will get lost in it, thinking about the craft of the artists and why they chose to structure the songs the way they did, which will lead me to lose focus from the shed building. Not good.
The solution was the Hello Internet Podcast. It’s two very smart guys talking about fun stuff. One is CGP Grey, the well-known educational YouTuber, the other is Brady Haran, also educational YouTuber with a focus on the natural sciences and a history as a BBC journalist. Hearing them talk about life is fun easy-listening. The amount of episodes I hadn’t listened to before turned out to be perfect for the remaining hours of building the house.
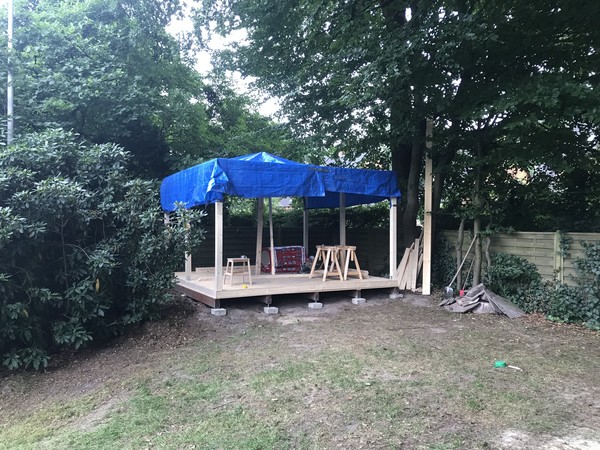
I mentioned the rain. Also, Hamburg is located in an area that often gets snow during winter. So the roof has to withstand quite a bit. I put the shed into a location within the garden which is covered with trees up top, so they will hold up a good part of the rain and snow hopefully. But not everything. So after another researching session I found the easiest solution would be to use Bitumen and a slated roof on top, which has at least 2.5 degrees of angle, so the water and objects can run down.
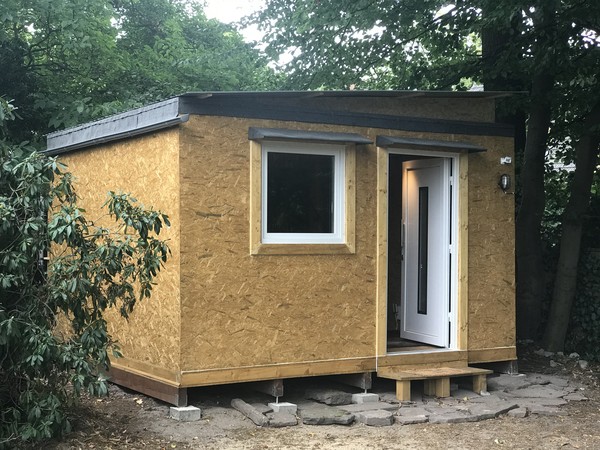
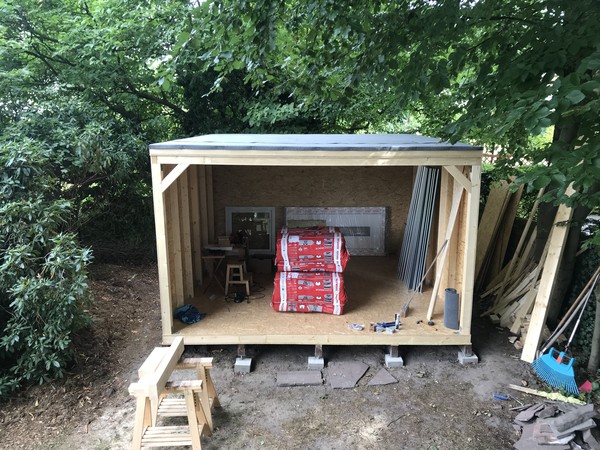
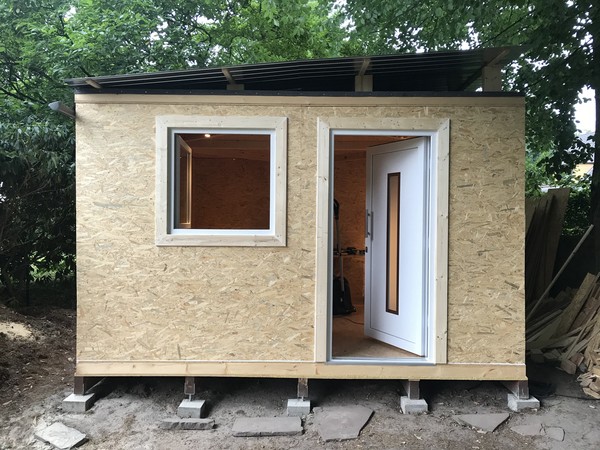
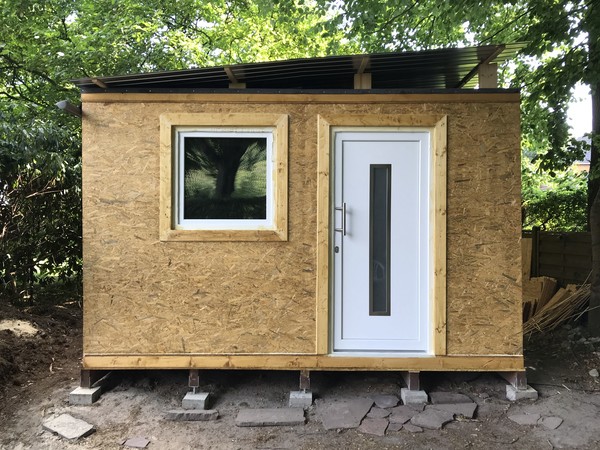
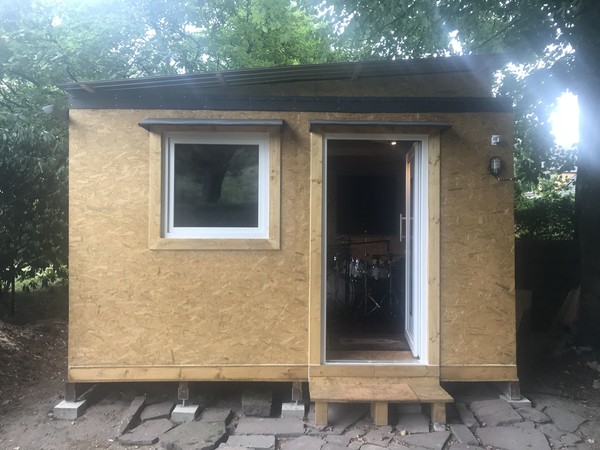
In the picture, you can also already see some more supplies I got, like the door and window in the back.
Putting the metal sheets on top of the bitumen went well, too. I could walk around on the roof, no problem. The build quality and chosen timber thickness was good enough, apparently.
Come In, Look Out
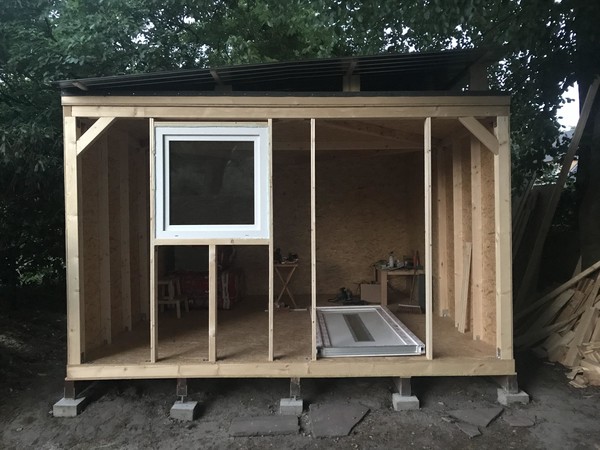
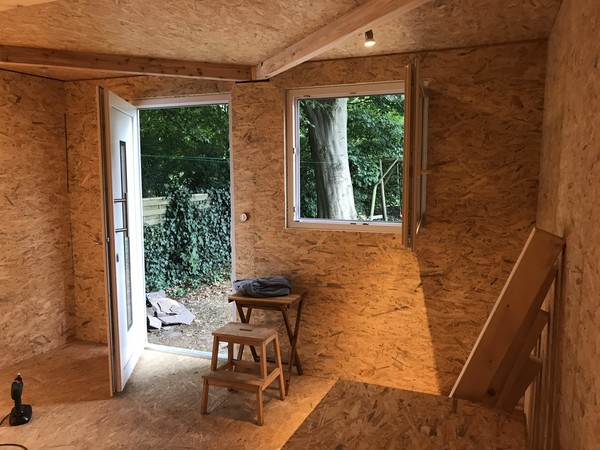
A few more YouTube videos helped me to understand the process of putting a window and a door into a wall. Not complicated at all, but one the other hand, not easy to do perfectly aligned on your own. I chose to start with the window, to practice. If it turns out a bit crooked, I can learn from it and make the door fit better. And that’s what happened. The window is the cheapest three glass sheet window I could find. At around a hundred bucks, I was quite happy with the deal.
Some screws hold the window’s frame to the wooden frame I built, always correcting the position of the window while doing that. I put little pieces of wood between the two frames to control the space between them. My water level was a big helper here. Still, In the end I forgot about one of the axis’. The world is 3D, stupid! So, after I put in the building foam to keep it all insulated and stiff, let that dry and cut off the remaining stuff, I opened the window for the first time, just to find out it’s slightly tilted inwards. The window, once opened, will swing open wide. Crap! This is not easy to correct, so I chose not to.
The heavy door is another topic. Rather hard to even lift up. But I had learned from the mistakes and managed to put the door in without these irreversible problems. Glad.
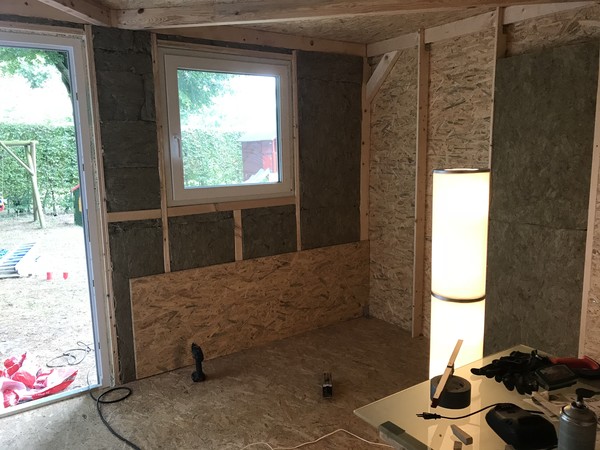
Despite the window and door, it‘s getting dark in here. At which point I realized I had to find solutions for lighting and electricity, too. Sure, I knew about this task beforehand, but right now, it would already have been useful to have the lighting completed.
Thinking about how to solve the electricity problem, I contacted another friend of mine who has quite a bit of experience in that matter, Andreas. He’s a great guy and had the perfect solution for me: a caravan camper inlet and adapter. That way I could just plug in the whole house. Cool!
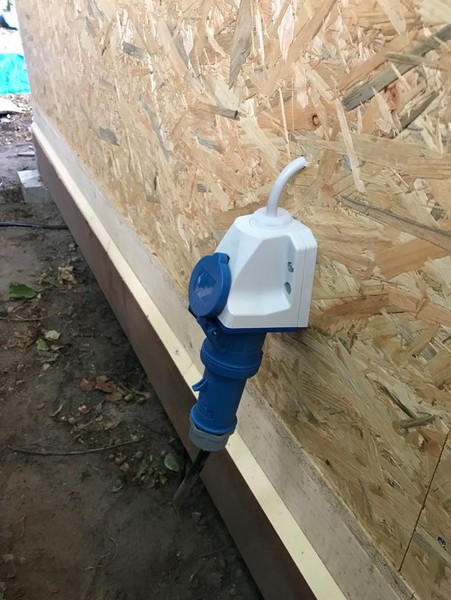
Sure, working with electricity is nothing to take lightly. I had a bit of experience from soldering experiments years earlier, but with big time electronics I could just get back to YouTube again to learn. Safety first, of course. I’m glad to say that it worked out well.
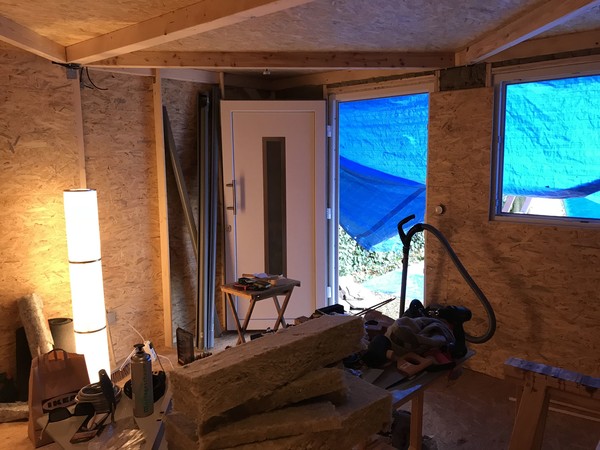
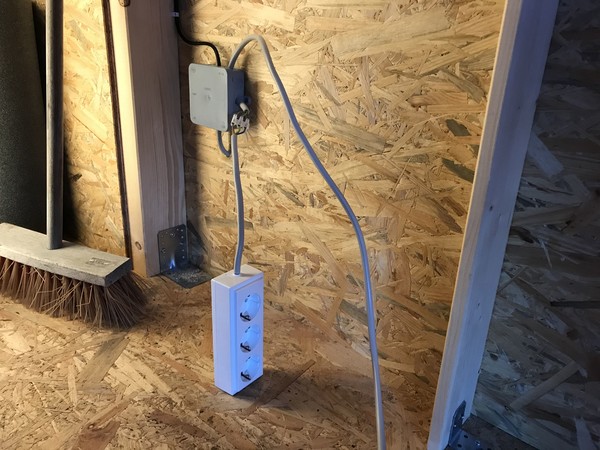
I bought four of the IKEA TRÅDFRI LED lights and a simple switch, put the lamps evenly on the ceiling and connected it all to our HomeKit, so I can turn on the lights with my phone as well. Just for fun.
That looks good enough, I think. Seems to be about done.
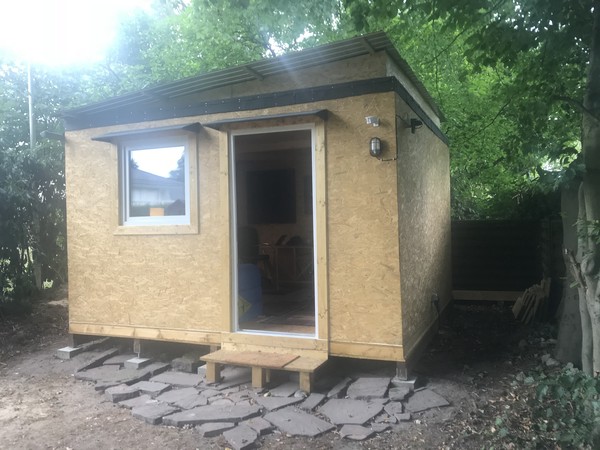
On the top left side you can see a rain gutter. I had to use that later, after the first rain hit the roof and ran down the left outside wall. It found its way into the house, even. After putting the rail on the side and a tube down in the back, leading into a big rain collector barrel, the problem was solved. No wet wood anymore.
And Now, the Best Part: Carrying Over the Drum Set!
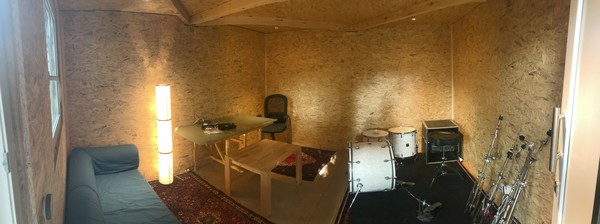
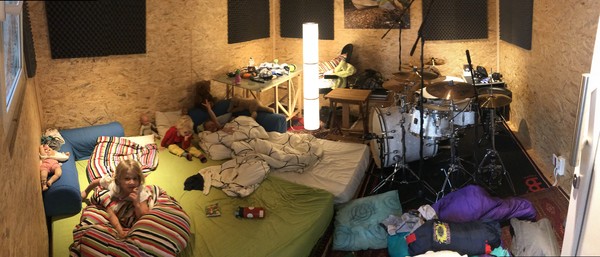
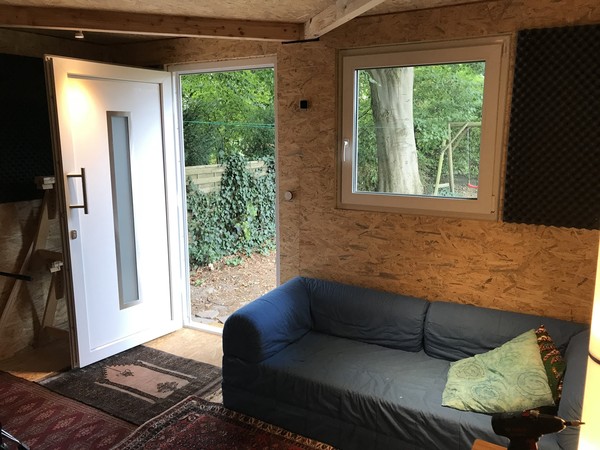
The house turned out to be big enough for a spare desk and chair, as well as a couch we had lying around in the house. So, sure enough, the next step had to be breaking it in by having a sleep over in it with the kids!
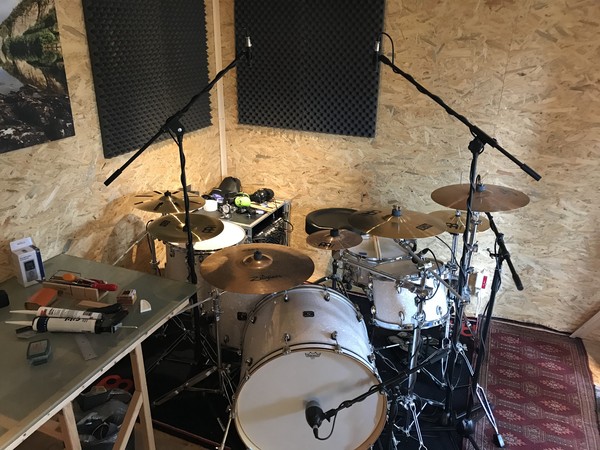
You can see some wall insulation I put up to improve the drum sound. But I’m not happy with the sound of it inside. That’s why I put microphones on all the drum parts and change the sound electronically with a sound mixer, which then gets fed into my headphones while playing. That way, I can also put a phone into the mixer and tune in some music to play along to.
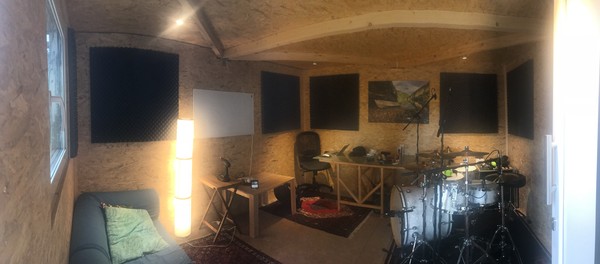
I’m very happy with how it turned out.

The Heating
In summer this isn’t a problem. The house is well protected by the trees and even during the hottest days it won’t heat up to unbearable temperatures. Winter is another thing. There’s no way around putting some heating inside, as even the best insulation will let some of the heat escape. And the drum set would not like to freeze, it’s bad for its material.
My conclusion was to hang up an infrared heater, because apparently these are quite efficient measured by the Watts they need. I connected it to a temperature sensor switch that deactivates when 15 degrees is reached. Also, I put another HomeKit connected temperature sensor into the shed so I can see the temperature changes over time on my phone and have control over it from far away.
To measure the Watts running through it all, I got another small adapter. At the time of writing this, early December, having already had a few weeks of near zero temperatures, the heating stayed constant and cost me 38 bucks total over the last three months of autumn. I suspect it will get harder for the little infrared heater during January and February, but I will have to see and make changes on the fly. So far, I’m happy with the solution.

The End Count
I started on the 4th of July and got to this stage by August 20th. Seven weeks, roughly. And the hour count went up to 88 hours and 45 minutes in the end. That’s about one and a half hours on average per day.
Which is a lot less than Mister Money Mustache’s 120 hours, so I won!
Well, I won this part. On the cost side, I came in slightly over budget, with 3.342,36 Euros spent on materials and 251,43 spent on tools. Roughly 200 Euros per square meter created. Still, this is a cost-point I’m okay with for how it’s turned out and especially considering the many years of fun I and the family will have with this house. (And the hours of fun I had while building it.)
Some maths, again: If the house stands just for a year and I manage to play for a total of 2 hours per week, an hour in it will have cost me about 33 Euros. Ten years, and it’s just 3 Euros per hour. And imagine the kind of drummer I’ll turn out to be if I manage to keep practicing for two hours per week over ten years – that’s 1.000 hours! (Mental note, check back in during summer 2028.)
And that’s not counting the other uses the house will have. Like serving as a party shed for the kids when they get older, for example. If the house will survive that, it’s truly a well-built shed! 😄
[Update October of 2020: Over the summer I replaced the roof and made a few other improvements. See the blog post.]
How do you feel after reading this?
This helps me assess the quality of my writing and improve it.

2 Comments
Write a CommentFitfuturegroup wrote:
20th of November, 2025 14:20
Leave a Reply to Fitfuturegroup
→Teesche replied:
20th of November, 2025 18:08
Leave a Comment